Wednesday, September 29

Fall Open House

Today is the day of the Fall Open House at Hooked on Houses. Welcome to our home!

This year I made a magnolia leaf swag for our front door. I'll add some pumpkins to the door as soon as they're available at the grocery store.


Now that the weather has turned fallish, we could sit here on the front porch and have a cup of coffee. Out here I added a Pottery Barn knock-off pillow and some autumn leaf pillows. These are made from drop cloths, so they're very durable. I changed out the plant on the side table for some Dollar Tree mums and added some beaded garland.


Inside, my house is very happy in the fall, because I use lots of fall colors in my decor year-round. I love rich browns and golds and greens and reds.


Most of my special fall decor is in the form of pumpkins. I started collecting pumpkins 25 years ago, when I was a new bride. I've tried to add one to my collection every year. Lots of the pumpkins are massed on my mother's dough cabinet in my breakfast room. This is one of my favorite places to decorate for any holiday.


The table in the breakfast area gets used constantly, so I don't do too much with it. But I'm loving this beverage-caddy-turned-vase on the table. Mums cost very little at the grocery store, and they last a long time.


A few of my pumpkins are on the sideboard in the dining room. The dining table doesn't get used for eating very much, so it's a good place for a burlap runner and some fall decor. I made the acorn topiaries, and I really like them here.


And then a few pumpkins are scattered here and there throughout the house, like these on the coffee table. I'll bet you recognize these as Dollar Tree finds!


We'll end our tour on the screened-in porch out back, where I've added some pumpkins on the lamp table, a fall wreath, and some table decor. Actually, the table decor consists of a tablecloth folded into a runner and a green bowl filled with decorative gourds surrounding a chunky candle. Simple but pretty.


How do you decorate for fall? If you need more inspiration, check out Julia's party!

Fall mantel

Nester's having a Fall Mantel Party!

So I'll show you the mantel in my husband's study. See the stone fireplace on the left in this photo?


That's the fireplace for my husband's study. It's one of our favorite features in the house.

His study is a fairly dark and cozy space, which makes for a very inviting room, but it's hard to get good photos. But here's one of the mantel itself:


Since this is my husband's space, he gets to choose what's what. He particularly likes nautical art, so he loves the framed prints in his study. As for the mantel itself, my husband wants photos of our family. I can't complain about that! So I just added a few little accessories to make it look warm and inviting for fall.

These photos are dark, but they give you a feel for the fireplace in the room:


I love a chair and ottoman by a fireplace. It took me awhile to find a leather club chair that would fit in this little corner but still be deep enough to accommodate my husband's 6'7" frame. This one is made by Bassett Furniture, and it's just right.

Check out Nester's party for lots of mantel inspiration!

Tuesday, September 28

The sweetest gift


Last week I posted pictures of my master bedroom. After reading that post, one of my readers asked about this photo:


"Is that you?" she asked. Yes, it's me. That portrait has hung in my house for 10 years now. It's just part of the scenery. I tend to take it for granted. But I shouldn't. That portrait tells a love story.


You see, I've always struggled with self-esteem, particularly regarding my appearance. When I was a child, I lived in a family of beautiful ducks, and I was an ugly duckling. But my self-esteem issues went much deeper than you'd expect for a girl who was an awkward adolescent. I've had some help figuring out the root of my struggles, and I've learned that they're mostly rooted in the fact that I have a birthmark that covers most of the right side of my body. It's a multi-faceted issue, and in the past few years I've made a lot of progress in dealing with it.

But 10 years ago I was right in the thick of it. Although my husband didn't understand all the issues involved in my struggle, he knew I was struggling. And he wanted to help.

"I just wish you could see yourself the way I see you," he would say. He thought I was pretty, but I couldn't see myself that way. I could only see myself as the girl with the birthmark.

Finally he came up with a plan. For our 15th wedding anniversary, he bought me a lovely gift. But more importantly, he asked me to give him a gift. "I want a portrait of you," he said. "I want you to find a real photographer and have a portrait made of yourself. Not of you and the boys, not of our house, not of anything but you. I want a full-length portrait of you."

Is that the sweetest thing you've ever heard? And he was serious.

I resisted for awhile, but he persisted. He pushed. He prodded. He helped. He enlisted the help of a friend. And in the end, I got to be Queen for a Day--a day of having my hair styled, putting on an evening gown, going to the photographer's studio and out on location, and having my portrait made. I learned that a good photographer takes lots of photos and that some of those end up being good--good enough that even I had to admit that they were pretty. Even though the woman in the portrait has a birthmark, that's not what shows. In all those photos, there's not one glimpse of my birthmark. And that's the way my husband sees me.

I always see my birthmark, and I assume that's what other people see, too. I assume the worst. In his loving way, my husband wanted me to know that my vision was skewed.

Did it work? Did I learn to look at myself the way my husband sees me? Well, not completely. I've continued to struggle with this issue, and I'm still wrestling with it. But it helped. And that gesture was one of the kindest things anyone has ever done for me.

What a treat for me to be reminded--a gift gratefully unwrapped this Tuesday with Emily.


Friday, September 24

Show us your life: the master bedroom


Kelly from Kelly's Korner is sponsoring a series of posts called "Show Us Your Life."  I love the way blogging gives us a peek into one another's homes. Kelly has asked us to feature master bedrooms today, so here's a look at ours.

Our master bedroom is on the main floor of our house. Actually, this is one of the things we really like about our house--right now we have three kids spread over three floors of this house, but eventually it'll just be the two of us here. . . and if we need to, we can live on the main floor. Having a bedroom that can be reached without climbing any stairs was a Godsend when my son had open-heart surgery--and 10 months later when my husband had open-heart surgery.

My bedroom walls are a soft greyish-blueish-green color called "Mystery Green" by Sherwin Williams. I love the way the white trim and white plantation shutters look against this color. I don't know if I'll ever add any window treatments other than the shutters. Plantation shutters are my favorite window covering of all time. I love the way they look all by themselves.

Now, the bed. I made all the bedding, including the huge coverlet. (I couldn't find a bedspread or duvet cover quite large enough to cover my bed, so I made one using my very elementary sewing skills. Click here if you'd like to read about it.)


Then going around the room clockwise--
A cozy seating area:


Our massive dresser (I love this huge piece and the lamp on top of it--Pottery Barn clearance a few years ago!). This wall still needs some artwork:


And an antique chest of drawers (which holds my gift wrapping supplies, by the way--does anyone else wrap presents on the bed?):


Our bed and dresser were purchased on clearance from Restoration Hardware. The other pieces were collected over the years, mostly from estate sales. We've been married 25 years, so we've been collecting for awhile. . . and still our room isn't quite done. That's all right, I guess--I'm planning to be married to my husband for the rest of my life, so I'll have a while to work on our bedroom.

Check out lots of great master bedrooms at Kelly's place!


Thursday, September 23

Table transformation under $10
and under 1 hour


I love taking an old piece of furniture and transforming it into something lovely.  But sometimes the supplies required for the transformation can cost more than the furniture!  Not this time.

My latest Under $10 Under 1 Hour project was creating this:

Table transformation with spray paint


from this:

Here's how I did it cheaply and easily.

My tools:

Perhaps you can see that I bought that can of Krylon's "Bahama Sea" paint on clearance for $1.50. My Wal-Mart was selling odds and ends of paints, and I just happened to luck upon this color. The Minwax Wood Sheen I've had in my paint supplies for years. 

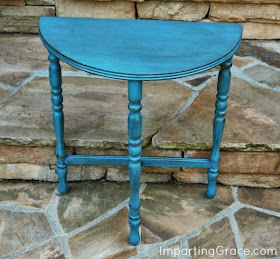
I did absolutely nothing to prep the table for painting. I knew that I wanted an aged finish, so I figured it didn't matter how good the paint job was. I just sprayed the Krylon on. One can was plenty for two coats. And here she is in her bright-blue glory:
Next I took a piece of fine-grit sandpaper and distressed the table a bit. (By the way, I love distressing furniture. It seems that so many of my efforts go into trying to make myself look younger--it's fun to purposefully try to make something look older!) I just sanded some of the blue paint off on the edges, the outer margins of the curves, etc. Wherever it seemed that the table might naturally have gotten beat up over the years, I sanded. This took 5-10 minutes. And then I had this:
Then for the crowning touch, I took paper towels and smeared some of the Wood Sheen onto the table, then wiped off most of it. I can't think of any other way to describe my technique. "Smear and wipe" is exactly what I did. I just smeared and wiped until I was happy with the way the table looked:
The smearing and wiping took about five minutes. Honestly, it took longer for me to take the photos and write this post than it took to complete all the work.

The cost?
Table: free (a gift from my sister's attic, several years ago)
Paint: $1.50 (regular price $2.97)
Stain: free from my stash
Paper towels: pennies

So this project was actually Under $2 Under 1 hour.  That's my kind of project!


And here's the little table in her new home in my blue and brown bathroom:
If you can file your nails and wipe off the kitchen counter, you can produce a piece like this. Those are the only skills you need. It's fun! And cheap! And easy!

One of my very favorite bloggers, Melissa from 320 Sycamore, is hosting a wonderful party to showcase this kind of project: Under $10 Under 1 Hour.  Check it out! I'm also joining the fun at The Shabby Nest and at Finding Fabulous. So many wonderful frugal projects! And I'm happy to link up to Amanda's Weekend Bloggy Reading round-up. 

Happy painting! 


Wednesday, September 22

Decorating with blue and brown

Today is the Great Blue and Brown Blog Bonanza at Cottage Instincts. How's that for a party theme?
This color combination has long been a favorite of mine. Most of my blue and brown can be found in my master bedroom and bathroom.

My bed:


I made my bedding, which means it had to be very simple to make. (Click here to read about it.)

Just in time for this party, I made a little tassel for my lamp out of some leftover trim:


The wall color in my bedroom is Sherwin Williams' "Mystery Green." It's a wonderful blueish-greenish-greyish color that can be cool or warm. Very soothing.

My bathroom:


The wall color here is Sherwin Williams' "Craftsman Brown."

I covered a little chair for my vanity in the same fabric as my bed pillows.


Just this week I painted a little table for the bath:


See how the blue pops against the Craftsman Brown walls? Love it.

One of my favorite projects for my bedroom was recovering a thrift-store ottoman with the blue and brown houndstooth:


This ottoman stays in my closet. When it's not covered with clothes to be folded, it's a handy place to sit and put on shoes. Its lid is hinged, so it's a great place to hide things. And it's popular with my pound puppy, Cocoa:


I guess she knows that her colors go well with the ottoman.

Do you like blue and brown? Check out the party at Cottage Instincts for lots of inspiration!


Tuesday, September 21

And finally, Fall

I look at the weather forecast for North Carolina this week, and here's what I see:

Tue 9/21 Hi: 88 Lo: 63
Wed 9/22 Hi: 92 Lo: 66
Thu 9/23 Hi: 95 Lo: 67
Fri 9/24 Hi: 91 Lo: 65

And I complain. I so long for fallish weather. I want to do fallish things. I want to wear sweaters.

But then I look at the calendar, and I am reminded that no matter what the temperature is, this is the week of the Autumnal Equinox. No matter what I might be doing or not doing, the days go by. The seasons change. And I am reminded:

Summer and winter, and springtime and harvest--
Sun, moon, and stars in their courses above--
Join with all nature in manifold witness
Of Thy great faithfulness, mercy, and love.

Great is Thy faithfulness!
Morning by morning new mercies I see!
All I have needed Thy hand hath provided--
Great is Thy faithfulness, Lord, unto me.

So whether I'm wearing shorts and sandals or a sweater and boots, I'll unpack the pumpkins.


Fall comes not because it feels like Fall to me, but because God says so. And I am grateful.

Monday, September 20

The end of summer

Today is the very last day of summer. And I've got just one thing to say about that:

Hallelujah.


It's not that I don't like summer. Summer is okay. But those lazy, hazy, crazy days drag on a little too long for me. I'm ready for crisp air and crunchy leaves and chilly nights. I'm ready for socks and closed-toe shoes.

Summer stretches on and on, sometimes feeling as if it will never end. Autumn, on the other hand, comes with a sense of energy and even urgency. It gives me a boost of energy, a desire to get up and get moving.

So I'm up and moving quickly, a spring in my step and a song running through my mind. Do you know it?

September Song

Well, it's a long, long while
From May to December
But the days grow short
When we reach September
When the Autumn weather
Turns the leaves to flame
One hasn't got time
For the waiting game

Oh, the days dwindle down
To a precious few
September~
November~
And these few precious days
I'll spend with you
These golden days
I'll spend with you

K. Weill and M. Anderson

What about you? Are you happy to see Autumn come? Or sad to see Summer go?

Thursday, September 16

Champagne taste on a beer budget: flowers in your home

Don't you love having fresh flowers in your house? I do. They bring vibrancy and beauty into a space in a way that few other things can match.

Image courtesy of FlowerBarn1.com

For years, though, I shied away from having fresh flowers around. I had the idea that having flowers in the house meant having a "flower arrangement"--you know, a formal piece of work from the florist. And I do so love the work that florists do--"flower arrangements" are among my very favorite things. But I've learned that I can enjoy fresh flowers in my house without the expense of employing a florist.

The easiest and least expensive way to have fresh flowers is to grow them yourself. I love the early summer months because of the abundance of hydrangeas, one of my favorite flowers. My hydrangeas are gone now, but I still have some gardenia blossoms on my bushes. Look how pretty just a few blossoms look floating in a crystal dish:


(Yes, that's a picture of the back of my powder room toilet.
In addition to looking pretty, the gardenias make the whole room smell delicious!)


When you don't have any home-grown flowers to use, try the floral department of your grocery store. At my local grocery store, the best buys are usually the bunches of one type of flower. These pre-packaged bunches come with a "Fresh Thru" date, so I always look for the bunches with the latest date. You can get a lot of bang for your buck by buying a single kind of flower, like these lilies:


Those are in a silver pitcher that I found at a thrift store. It didn't clean up well, so I just spray-painted it heirloom white and then rubbed off a bit of the paint with fine-grit sandpaper. I think it makes a beautiful vase. A good trick is to cut off the long stems so that you don't see a lot of stem above your container. You want to see the blooms, not the stems.

To tell the truth, I use alternative containers more than I use vases. For instance, look how pretty simple gerbera daisies look in water bottles:


My newest acquisition is this galvanized metal six-pack drink caddy from Pottery Barn. I had a Pottery Barn gift certificate, and I thought this was a pretty good deal for $29.


Image courtesy of Pottery Barn

As I looked at it, I realized that it would be just the right size to hold the plain glass cylinders available in the candle section at Dollar Tree. So I bought six of the cylinders.


And presto! A instant flower arrangement! Look at just a few grocery store stems in the caddy:


I took this photo when I'd had these flowers for six days. That's another trick: look for long-lasting flowers, like these spider mums. Daisies, alstromeria, lilies, carnations, and mums are all really good choices for long-lasting blooms. Roses? They're beautiful, but they droop after one day.

Do you have fresh flowers in your house? Have any tips to share? I'd love to hear them!

**Check out Frugal Friday at The Shabby Nest and Frugalicious Friday at Finding Fabulous for other great frugal finds!