I recently revealed my guest room updates, with most of the changes coming from new accessories sewn by me.


One of my favorite features of the room is one of the smallest: the new bolster pillows made from the bold checked accent fabric. I love these babies!

There's a secret behind these bolsters: they're completely NO-sew creations. Here's how I made them.
First I cut the fabric to go around my bolster pillow form. Actually, I had an old pillow to recover. I cut a rectangle of fabric 25 inches wide x 29 inches long to go around my form, which measured 15 inches long and 7 inches in diameter. No precise measurements here--just be sure to have a big enough piece of fabric to completely cover the form. Turn under one of the long sides of the fabric and press well. This will end up being your "seam" line on the bottom of the roll, so you want it to be nice and neat.

Then I wrapped the fabric around the pillow form so that the wrong side of the fabric was facing out. As you can see, I used backed silk for this pillow, which worked well. I think you could use any medium- to heavy-weight fabric. With the fabric wrapped around the pillow form, secure the two ends as if you were wrapping a piece of candy. I used rubber bands for this. You could use string just as well. Here's what you'll have; I think it looks kind of like a giant Tootsie Roll.
Take the pillow form out of the wrapper. Here's what the ends will look like:

Now, turn the cover right-side out. The bunched up ends will disappear inside the cover.
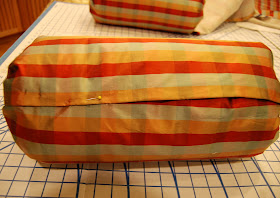
Once the cover is right side out, stuff the pillow form back in. Pull the fabric good and taut around the pillow, then use the method of your choice to close the seam. I used my glue gun. You could also use fabric glue or Stitch Witchery. Or if you're good at hand sewing, you could sew the opening closed. My glue gun worked fine. As you can see, I pinned as I went along so that the fabric would stay in place while the glue dried. Tip: Be sure the remove the pins before the glue dries completely--you don't want a straight pin stuck in your pillow!

You can leave the pillow like this or add a finishing touch of some kind to the ends. I wanted covered buttons for the ends of mine. You can find covered button kits at any fabric store. The directions are super-easy to follow. You can then sew the buttons onto the ends of the pillow or do what I did and hot-glue them into place.


AAHHHHH, very clever. It looks professionally sewn to me!
ReplyDeleteThat is adorable! I love that is no sew and so easy to make!
ReplyDeleteYour guest toom is lovely and no - sew . . . perfect.
ReplyDeleteFondly,
Glenda
Great tip!! I love that you used the button covers. :)
ReplyDeleteThat is stinking AWESOME!! I would have never in a million years thought to do the pinch the ends and then flip it inside out. Brilliant! Thanks for the tip!
ReplyDeletejust where did you learn all these wonderful little tricks?!!! Amazing. You give me inspiration to try one of these myself.
ReplyDeleteGreat idea! I love it!!!
ReplyDeleteAbsolutely FABULOUS! I will definitely be doing this trick! Thanks for the hint.
ReplyDeleteUmmm, that's total genious! I have a borrowed icky love seat in my office right now that has bolster like pillows that I was wondering what to do with if I used a slipcover on the love seat & this trick might work! I'll let you know if I give it a try :-)
ReplyDeleteThis? I can do. Thanks for sharing!
ReplyDeleteRichella...this is awesome. I loved your no-sew pillows! You always have such clever ideas girl.
ReplyDeleteYour guest room is lovely. I like that it has twin beds.
You inspire me.
Love ya,
Linda
GENIUS!! You seize to amaze me!! Been praying for your son & hope he is doing better!!
ReplyDeleteVery clever, Richella! I love bolster pillows and I love how you recovered yours. The addition of the buttons is a nice touch.
ReplyDeleteThat IS pretty! I love covering buttons, too. :)
ReplyDeleteLove, love, love it! Thanks for sharing!
ReplyDeleteMelody
Chattychics.com
Thank you for your effort
ReplyDeleteI love the idea of using an old towel rolled up to make the pillow. The cover looks so simple too! I think I will try this one!
ReplyDeleteLove, Linda
Totally loving this, Richella! I am a no sew gal and I love the use of rubber bands! Since I've never sewn (only mended) I've never used fabric much in my decor (or at least what I picked out) but this is a great idea! My husband threatens to leave if I bring home any more pillows from yard sales! I'll miss him. (Just kidding.)
ReplyDeleteRichella, I finally had a chance to look at your new sew pillow & I LOVE it! I'm definitely doing this one with my bolster pillow and I'll link to you. What a great tip and idea!!
ReplyDelete