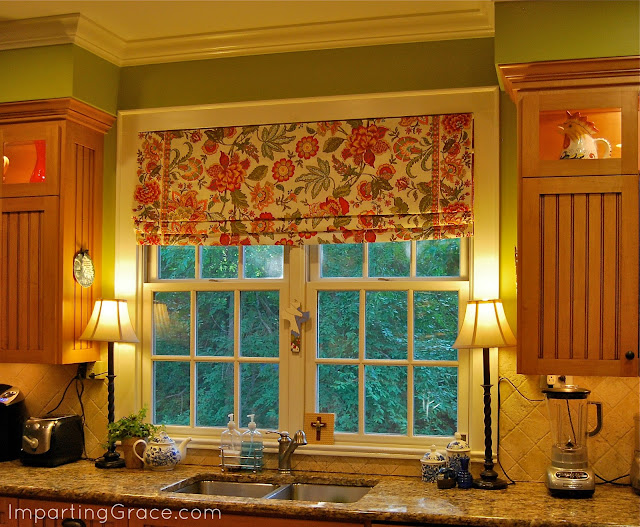
Years ago I created a method for making no-sew faux Roman shades. With hundreds of thousands of views, that tutorial is my most popular post of all time.
I've been in a mood for change, though, so I wanted to replace the dark fabric with something lighter and brighter. But I had a couple of problems:
- This window faces west, and light fabrics let too much light through to look good, even when doubled.
- This window is 57 inches wide, so even extra-wide fabrics didn't quite cover the whole space.
I am not an expert seamstress. I have never been able to get the lining of anything to lie flat. So that option wouldn't work. I tried to glue the liner to the shade, but that didn't work well, either. Still couldn't get that thing to lie flat. All I got was a bunched-up mess.
As I stood there surveying my bunched-up mess, I said to myself, "If only there were some way just to get the liner to cover the window without having to attach it to the shade."

Then the light bulb turned on. I cut a small piece of black-out liner to cover the top of each window and simply stapled them in place.

Couldn't have been easier.

The lining panels are completely hidden behind the shade. They just quietly hang there and do their job. I may write them a love song.
Now for the second problem! Once lining issue was solved, I was free to use any fabric I liked, but I still had the challenge of the extra-wide windows.
Then I ran across the Kavita tablecloth from World Market. The colors were exactly what I wanted, and best of all it was 60 inches wide. More than enough for my window!
I bought the 60"x120" tablecloth and followed my own tutorial to create a new Roman shade. (It uses a secret tool: the oval tension rod

I especially like the way the pattern of the tablecloth provides interest on each side. I was simply careful to hang the shade so that the design is centered on the window.
A brand-new look for my kitchen window for a little bit of time and less than $40.00. I'm so happy with it!

What do you think? See any tablecloth-cum-Roman-shades in your future?
I'm joining these great parties:
Weekend Bloggy Reading at Serenity Now
*This post contains affiliate links.
If you make a purchase after clicking on these links,
I will earn a small commission.
Your price will not be affected in any way.*


